
Roboki: Difference between revisions
Evobi admin (talk | contribs) mNo edit summary |
Evobi admin (talk | contribs) mNo edit summary |
||
| Line 81: | Line 81: | ||
= '''Hardware:''' = | = '''Hardware:''' = | ||
Roboki's hardware is designed to support a variety of robotics projects with precision and flexibility. Its durable components, including motors and sensors, ensure smooth operation and enable interaction with the environment, making it perfect for both simple and complex builds. | The Roboki-T1 includes various hardware components: the Roboki Brick and various mechanical parts such as Technic blocks, motors, sensors, and port connectors. Roboki's hardware is designed to support a variety of robotics projects with precision and flexibility. Its durable components, including motors and sensors, ensure smooth operation and enable interaction with the environment, making it perfect for both simple and complex builds. | ||
=== The Roboki Brick: === | === The Roboki Brick: === | ||
---- | ---- | ||
=== Roboki Anatomy: === | |||
==== <big><u>Roboki Anatomy:</u></big> ==== | |||
Roboki is designed with simplicity and functionality in mind, offering an intuitive layout for young learners to explore. Each part of the kit plays a specific role, from powering the robot to controlling its movements and sensors. Below is an overview of the key components and their functionalities:[[File:Roboki Anatomy.jpg|left|frameless|686x686px]] | Roboki is designed with simplicity and functionality in mind, offering an intuitive layout for young learners to explore. Each part of the kit plays a specific role, from powering the robot to controlling its movements and sensors. Below is an overview of the key components and their functionalities:[[File:Roboki Anatomy.jpg|left|frameless|686x686px]] | ||
{| class="wikitable" | {| class="wikitable" | ||
| Line 132: | Line 134: | ||
|} | |} | ||
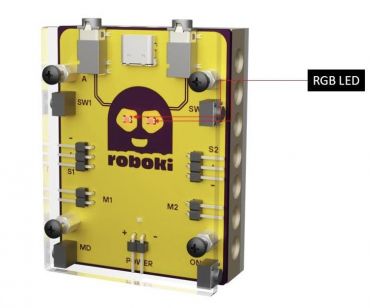
* Port A & Port B : Port A and Port B are dual-purpose ports, allowing you to connect two devices to each port using a splitter. This effectively gives you four ports in total. Both ports support analog and digital signals, offering flexibility—use them as 2 analog and 2 digital on each side or configure them as 4 analog and 4 digital ports altogether. | * '''Port A & Port B :''' Port A and Port B are dual-purpose ports, allowing you to connect two devices to each port using a splitter. This effectively gives you four ports in total. Both ports support analog and digital signals, offering flexibility—use them as 2 analog and 2 digital on each side or configure them as 4 analog and 4 digital ports altogether.[[File:Roboki's RGB LED eyes.jpg|right|frameless|370x370px]] | ||
* '''RGB LEDs (Eyes) :''' Roboki is equipped with customizable RGB LEDs that can be programmed to display different colors and patterns. These LEDs can be used to add visual effects to your projects, making them more interactive and engaging. | |||
Example Uses: | |||
● Status Indicator: Programming the RGB LEDs to change color based on the status of your robot (e.g., green for active, red for error). | |||
= '''Specifications:''' = | ● Replicate Emotions: Programming the RGB LEDs to change color based of the emotion you want to portray (e.g., blue for sad, red for angry). | ||
* '''Plug and Play Ports :''' Roboki features plug and play ports that allow you to easily connect external sensors and modules. This expandability makes it possible to enhance your projects with additional functionalities. | |||
* '''Nuts, Screws and Acrylic sheet :''' There is a protective acrylic sheet secured on top of the Roboki Brick. It shields the switches, ports, and other components while keeping everything neatly covered. The sheet measures '''''47.7 mm''''' in width, '''''63.8 mm''''' in length, and has a thickness of '''''3 mm''''', leaving a 5 mm clearance above the board. Four screws and nuts, located at the corners of the Roboki, hold the acrylic sheet firmly in place. | |||
The hardware used are '''''M2.5 x 16 mm''''' self-tapping screws and '''''M3 x 5 mm''''' metal hex spacers. | |||
==== '''<u><big>Roboki Specifications:</big></u>''' ==== | |||
The technical specifications of Roboki ensure that it meets the needs of young learners while providing enough functionality for advanced robotics projects. From its precise motor controls to its versatile GPIO ports, Roboki is built to offer flexibility, power, and connectivity for various creative applications.Let's take a detailed look at the specifications of Roboki : | The technical specifications of Roboki ensure that it meets the needs of young learners while providing enough functionality for advanced robotics projects. From its precise motor controls to its versatile GPIO ports, Roboki is built to offer flexibility, power, and connectivity for various creative applications.Let's take a detailed look at the specifications of Roboki : | ||
{| class="wikitable" | {| class="wikitable" | ||
| Line 177: | Line 191: | ||
|} | |} | ||
== Motors == | ==== <big><u>Motors</u></big> ==== | ||
Roboki includes two high-quality motors that are essential for moving parts of your robotic projects. These motors provide precise control and high torque, making them suitable for various applications such as driving wheels. | Roboki includes two high-quality motors that are essential for moving parts of your robotic projects. These motors provide precise control and high torque, making them suitable for various applications such as driving wheels. | ||
[[File:Motors png.jpg|252x252px|thumb|Motors]] | [[File:Motors png.jpg|252x252px|thumb|Motors]] | ||
| Line 210: | Line 224: | ||
|- | |- | ||
|Dimensions | |Dimensions | ||
|Length: | |Length: '''54.1 mm''', | ||
Width: '''23.8''' '''mm''' | |||
|- | |- | ||
|Weight | |Weight | ||
| Line 218: | Line 231: | ||
|} | |} | ||
== | ==== <big><u>Sensors</u></big> ==== | ||
Roboki comes with two Range sensors that allow your projects to interact with their environment. These sensors can detect distances that can be used to trigger different actions.[[File:Range sensors.jpg|257x257px|thumb|Range sensors]]Range Sensors: Detect the distance between the sensor and an object. Useful for obstacle avoidance and distance measurement. | Roboki comes with two Range sensors that allow your projects to interact with their environment. These sensors can detect distances that can be used to trigger different actions.[[File:Range sensors.jpg|257x257px|thumb|Range sensors]]Range Sensors: Detect the distance between the sensor and an object. Useful for obstacle avoidance and distance measurement. | ||
| Line 247: | Line 243: | ||
Example Uses: Obstacle Avoidance Robot: Use range sensors to create a robot that can navigate around obstacles without hitting them. | Example Uses: Obstacle Avoidance Robot: Use range sensors to create a robot that can navigate around obstacles without hitting them. | ||
==Plug and Play | ==== <big><u>Plug and Play Port Connectors</u></big> ==== | ||
Roboki features plug and play ports that allow you to easily connect external sensors and modules. This expandability makes it possible to enhance your projects with additional functionalities. | Roboki features plug and play ports that allow you to easily connect external sensors and modules. This expandability makes it possible to enhance your projects with additional functionalities. | ||
[[File:Port connectors.jpg|255x255px|thumb|Angled Port Connectors]] | [[File:Port connectors.jpg|255x255px|thumb|Angled Port Connectors]] | ||
| Line 326: | Line 322: | ||
See '''[[AI Cam|AI Cam<sup>[1]</sup>]]''' | See '''[[AI Cam|AI Cam<sup>[1]</sup>]]''' | ||
='''<big>Roboki Sessions</big>'''= | ='''<big>Roboki Sessions</big>'''= | ||
Explore a range of hands-on projects designed to enhance your understanding of robotics, programming, and automation with Roboki. Whether you're just starting out or looking to take on advanced challenges, these activities will guide you through the basics of LED control, sensor integration, and AI applications. From building a simple traffic light system to programming a voice-controlled robot, each project offers practical experience in developing real-world robotic systems. Perfect for learners of all levels, Roboki projects provide an exciting way to bring your ideas to life! | Explore a range of hands-on projects designed to enhance your understanding of robotics, programming, and automation with Roboki. Whether you're just starting out or looking to take on advanced challenges, these activities will guide you through the basics of LED control, sensor integration, and AI applications. From building a simple traffic light system to programming a voice-controlled robot, each project offers practical experience in developing real-world robotic systems. Perfect for learners of all levels, Roboki projects provide an exciting way to bring your ideas to life! | ||
Revision as of 13:17, 18 November 2024

Roboki is a fully customizable and codable robotic kit designed specifically for kids by Yudurobotics. Roboki is not just a toy; it's an educational tool that combines fun and learning, allowing children to explore the exciting world of robotics and coding. With Roboki, kids can build, code, and play with a variety of projects, enhancing their problem-solving skills, creativity, and technical knowledge.
Getting started
What's Inside the Box:
Inside the box of Roboki, you'll discover everything you need to bring your ideas to life. From the Versatile Roboki microcontroller to essential components, it’s your all-in-one toolkit for creating interactive, hands-on projects. Unbox the future of innovation with Roboki!
Roboki includes a set of components in the box that can be used to enhance its functionality. The package includes:
| Component | Component Image | Quantity | Component | Component Image | Quantity |
| Roboki Brick | 
|
1 | Wheel Rim | 
|
2 |
| Range sensor | 
|
2 | Wheel tyre | 
|
2 |
| Angle port connectors | 
|
2 | Caster Wheel | 
|
1 |
| Motors | 
|
2 | Axle 5 | 
|
2 |
| 15 x 11 block | 
|
1 | Pegs | 
|
20 |
| 11 x 7 block | 
|
1 | 90 Degree Pegs | 
|
2 |
| Beam 05 | 
|
2 | Pin connector | 
|
1 |
| Beam 15 | 
|
1 | 1 x 6 Brick | 
|
1 |
| Rubber bands | 6 | Beam / Block joiner | 
|
1 |
Hardware:
The Roboki-T1 includes various hardware components: the Roboki Brick and various mechanical parts such as Technic blocks, motors, sensors, and port connectors. Roboki's hardware is designed to support a variety of robotics projects with precision and flexibility. Its durable components, including motors and sensors, ensure smooth operation and enable interaction with the environment, making it perfect for both simple and complex builds.
The Roboki Brick:
Roboki Anatomy:
Roboki is designed with simplicity and functionality in mind, offering an intuitive layout for young learners to explore. Each part of the kit plays a specific role, from powering the robot to controlling its movements and sensors. Below is an overview of the key components and their functionalities:

| Part | Functionality |
|---|---|
| TYPE C PORT | Used to power up Roboki and its Programming |
| PORT A | GPIO Dual port |
| PORT B | GPIO Dual Port |
| SW1 | User Codable Switch 01 |
| SW2 | User Codable Switch 02 |
| M1 | DC Motor Port 1 |
| M2 | DC Motor Port 2 |
| S1 | Servo Motor port 1 (Internal Input) |
| S2 | Servo Motor port 1 (Internal Input) |
| RESET | Change modes / Erase programs / Reset the device |
| ON/OFF | On / Off Switch
( Simply tap once to turn it on, and double-tap to turn it off ) |
| POWER PORT | Used to connect an external battery |
| RGB Leds (eyes) | Output |
- Port A & Port B : Port A and Port B are dual-purpose ports, allowing you to connect two devices to each port using a splitter. This effectively gives you four ports in total. Both ports support analog and digital signals, offering flexibility—use them as 2 analog and 2 digital on each side or configure them as 4 analog and 4 digital ports altogether.
- RGB LEDs (Eyes) : Roboki is equipped with customizable RGB LEDs that can be programmed to display different colors and patterns. These LEDs can be used to add visual effects to your projects, making them more interactive and engaging.

Example Uses:
● Status Indicator: Programming the RGB LEDs to change color based on the status of your robot (e.g., green for active, red for error).
● Replicate Emotions: Programming the RGB LEDs to change color based of the emotion you want to portray (e.g., blue for sad, red for angry).
- Plug and Play Ports : Roboki features plug and play ports that allow you to easily connect external sensors and modules. This expandability makes it possible to enhance your projects with additional functionalities.
- Nuts, Screws and Acrylic sheet : There is a protective acrylic sheet secured on top of the Roboki Brick. It shields the switches, ports, and other components while keeping everything neatly covered. The sheet measures 47.7 mm in width, 63.8 mm in length, and has a thickness of 3 mm, leaving a 5 mm clearance above the board. Four screws and nuts, located at the corners of the Roboki, hold the acrylic sheet firmly in place.
The hardware used are M2.5 x 16 mm self-tapping screws and M3 x 5 mm metal hex spacers.
Roboki Specifications:
The technical specifications of Roboki ensure that it meets the needs of young learners while providing enough functionality for advanced robotics projects. From its precise motor controls to its versatile GPIO ports, Roboki is built to offer flexibility, power, and connectivity for various creative applications.Let's take a detailed look at the specifications of Roboki :
| Specification | Details |
|---|---|
| Dimensions | Length: 64.3 mm, Width: 48.2 mm, Height: 21.8 mm |
| Weight | 63.6 grams |
| Power Input | Type-C port, 5V |
| Battery | Internal battery, 3.7 V Li-Po 1200 mAh Battery |
| Motor Ports | 2 (M1, M2) |
| Servo Ports | 2 (S1, S2) |
| GPIO Ports | 2 (Port A, Port B) |
| Switches | 2 (SW1, SW2) |
| LEDs | RGB LEDs (Eyes) |
| Connectivity | Bluetooth (via PLODE app) |
| Processor | 96 MHz |
| Memory | 320 KB RAM, 4 MB Flash |
Motors
Roboki includes two high-quality motors that are essential for moving parts of your robotic projects. These motors provide precise control and high torque, making them suitable for various applications such as driving wheels.

Specifications:
| Specification | Details |
|---|---|
| Motor Type | DC Brushed Motor |
| Voltage Rating | 9 V |
| Stall Torque | 18 N-cm (Newton-centimeter) |
| Stall Current | 1.3 A |
| No-Load Speed. | 390 RPM (Revolutions Per Minute) |
| No-Load Current | 120 mA |
| Load Speed | ___RPM |
| Current Rating | 225 mA - 450 mA |
| Dimensions | Length: 54.1 mm,
Width: 23.8 mm |
| Weight | 42 grams |
Sensors
Roboki comes with two Range sensors that allow your projects to interact with their environment. These sensors can detect distances that can be used to trigger different actions.

Range Sensors: Detect the distance between the sensor and an object. Useful for obstacle avoidance and distance measurement.
Example Uses: Obstacle Avoidance Robot: Use range sensors to create a robot that can navigate around obstacles without hitting them.
Plug and Play Port Connectors
Roboki features plug and play ports that allow you to easily connect external sensors and modules. This expandability makes it possible to enhance your projects with additional functionalities.

Simply plug the connectors of your external sensors or modules into one of the ports on Roboki . The system will automatically recognize and integrate them, allowing you to immediately start using the new components.
Software control:
Roboki can be coded and controlled using many methods. All these methods are using the PLODE app.
What is the PLODE app?
Plode app and website transform coding and robotics into an exciting and accessible adventure for everyone, whether you’re a curious beginner or a tech enthusiast. With PLODE, you can effortlessly control and program an array of fantastic robots and kits like PeeCee, Roboki, PeeCee v0.1, Zing, Crawl-e, and Klaw.
Methods :
Roboki can be programmed and controlled through various coding methods, offering flexibility for different skill levels. Whether you are a beginner exploring robotics for the first time or an advanced user looking for in-depth control, the PLODE app provides several ways to code your projects. Each method is tailored to different learning stages and preferences.
- Hexa Block Programming: A unique and intuitive block-based coding system tailored for beginners.
- Block Programming: Standard block-based coding similar to Scratch, ideal for younger users and beginners.
- Flowchart Programming: A visual programming method that uses flowcharts to design logic.
- Python Programming: For more advanced users, Python allows for detailed and sophisticated programming.
- C Programming: Provides low-level control for advanced users familiar with C language.
Note: for detailed explanation on how to use the above methods , visit PLODE
Building with Roboki
● Project Examples
1. Basic Projects
Start with simple projects to get familiar with the components and functionality of Roboki.
a. Switch It Up:
Turning on the LEDs in the Roboki using the internal switches.
Tutorial Link: Watch and build now !
b. Sensor ON:
Turning on the LEDs in the Roboki using the data value from range sensor.
Tutorial Link: Watch and build now !
2. Advanced Projects
Once you're comfortable with the basics, move on to more complex projects.
a. Robo Car:
Building an Autonomous Rover using Roboki along with other included components.
Tutorial Link: Watch and build now !
Building a Robo Car that can be controlled remotely through the PLODE app.
Tutorial Link: Watch and build now !
● Building Blocks Compatibility
Roboki is compatible with building blocks, allowing you to combine your kit with existing building blocks to create more intricate and customized designs.
● Upgradeable Add-ons
Expand your Roboki kit with additional modules and accessories available separately. These add-ons can provide new functionalities and enhance your existing projects.
Integration of Add ON's with Roboki :
1. AI-cam with Roboki
The integration of AI Cam with Roboki significantly expands its functionality by introducing advanced visual recognition, voice interaction, and heightened environmental awareness. Connecting the AI Cam through the plug-and-play ports and managing it via the PLODE app enables Roboki to perceive its surroundings in a smarter way. With AI Cam, Roboki can recognize objects, respond to voice commands, and detect movements, transforming it into an intelligent, interactive robot. This upgrade enhances Roboki's ability to engage dynamically, making it a more responsive and immersive learning tool.

See AI Cam[1]
Roboki Sessions
Explore a range of hands-on projects designed to enhance your understanding of robotics, programming, and automation with Roboki. Whether you're just starting out or looking to take on advanced challenges, these activities will guide you through the basics of LED control, sensor integration, and AI applications. From building a simple traffic light system to programming a voice-controlled robot, each project offers practical experience in developing real-world robotic systems. Perfect for learners of all levels, Roboki projects provide an exciting way to bring your ideas to life!
Check out this page for knowing more about the projects : ● Roboki sessions
For Tutorial videos of projects and more : ● Roboki tutorials