
Roboki: Difference between revisions
Evobi admin (talk | contribs) mNo edit summary |
Evobi admin (talk | contribs) mNo edit summary |
||
| (56 intermediate revisions by the same user not shown) | |||
| Line 1: | Line 1: | ||
[[File:Roboki | [[File:Roboki png.jpg|thumb|372x372px|Roboki]] | ||
Meet '''''Roboki''''', the perfect blend of fun, learning, and innovation. Roboki is a fully customizable and codable robotic kit designed to spark creativity and ignite curiosity in kids and beginners alike. It is not just a kit, it is your passport to the world of robotics and coding. | |||
Roboki | Packed with versatility, Roboki combines the magic of PeeCee and Playdynamex into one beginner-friendly package. Whether you're building your first robot or experimenting with advanced concepts, Roboki has you covered. While it doesn’t include built-in sensors, it’s designed for limitless expansion—plug in your favorite modules or sensors, and let the adventures begin! Its plug-and-play ports and compatibility with Yudu Robotics' PLODE platform make coding and controlling projects an absolute breeze. | ||
Roboki empowers kids to build, code, and explore projects that enhance problem-solving, creativity, and technical know-how. From building a robot car to experimenting with sensors, the possibilities are endless. Affordable, straight forward, and packed with potential, it’s the ultimate starting point for anyone curious about robotics. Ready to turn curiosity into creation? Roboki is waiting ! Let's Dive more into Roboki. | |||
= | = Getting started = | ||
Roboki | Getting started with Roboki is all about understanding its capabilities and diving into its exciting features. This guide will introduce you to Roboki’s specifications, its versatile features, and how to maximize its potential for building and coding projects. From connecting sensors and motors to exploring creative possibilities, you will get a comprehensive look at what makes Roboki an ideal robotics kit. | ||
=Hardware:= | |||
The Roboki-T1 includes various hardware components: the Roboki Brick and various other components such as Technic blocks, motors, sensors, and port connectors. Roboki's hardware is designed to support a variety of robotics projects with precision and flexibility. Its durable components, including motors and sensors, ensure smooth operation and enable interaction with the environment, making it perfect for both simple and complex builds. | |||
==== <u><big>Anatomy:</big></u> ==== | |||
Roboki is designed with simplicity and functionality in mind, offering an intuitive layout for young learners to explore. Each part of the kit plays a specific role, from powering the robot to controlling its movements and sensors. Below is an overview of the key components and their functionalities: | |||
[[File:Roboki Anatomy 1.jpg|frameless|769x769px]] | |||
{| class="wikitable" | {| class="wikitable" | ||
! Part | |||
! Functionality | |||
|- | |- | ||
|Type | | Type C Port | ||
|Used to power up Roboki | |Used to power up Roboki and its Programming | ||
|- | |- | ||
|Port A | | Port A | ||
|GPIO port | |GPIO Dual port ''(Supports Both Analog & Digital)'' | ||
|- | |- | ||
|Port B | | Port B | ||
|GPIO | |GPIO Dual Port ''(Supports Both Analog & Digital)'' | ||
|- | |- | ||
|SW1 | |SW1 | ||
|Switch 01 | | User Codable Switch 01 | ||
|- | |- | ||
|SW2 | |SW2 | ||
|Switch 02 | |User Codable Switch 02 | ||
|- | |- | ||
|M1 | |M1 | ||
| | |DC Motor Port 1 | ||
|- | |- | ||
|M2 | | M2 | ||
| | |DC Motor Port 2 | ||
|- | |- | ||
|S1 | |S1 | ||
|Servo | |Servo Motor port 1 | ||
|- | |- | ||
|S2 | |S2 | ||
|Servo | |Servo Motor port 1 | ||
|- | |- | ||
|Reset | | Reset Button | ||
|Change modes / | |Change modes / Erase programs / Reset the device | ||
|- | |- | ||
| | | ON / OFF | ||
|On / Off | | On / Off Switch | ||
( Simply tap once to turn it on, and double-tap to turn it off ) | |||
|- | |- | ||
|RGB Leds (eyes) | |||
|RGB Leds (eyes) | |||
|Output | |Output | ||
|} | |} | ||
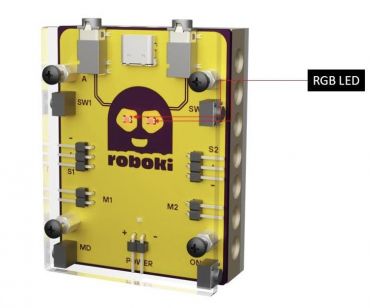
*'''Port A & Port B :''' Port A and Port B are dual-purpose ports, allowing you to connect two devices to each port using a splitter. This effectively gives you four ports in total. Both ports support analog and digital signals, offering flexibility—use them as 2 analog and 2 digital on each side or configure them as 4 analog and 4 digital ports altogether.[[File:Roboki's RGB LED eyes.jpg|right|frameless|370x370px]] | |||
* '''M1 and M2 Motor channels''' are each configured to operate at 500mA current. Roboki's total power output is capped at 2.5A, ensuring smooth operation for all connected components. As long as the combined power usage of the motors and other components stays within this 2.5A limit, everything will run seamlessly.<br /> | |||
*'''RGB LEDs (Eyes) :''' Roboki is equipped with customizable RGB LEDs that can be programmed to display different colors and patterns. These LEDs can be used to add visual effects to your projects, making them more interactive and engaging. Example Uses : | |||
**Status Indicator: Programming the RGB LEDs to change color based on the status of your robot (e.g., green for active, red for error). | |||
**Replicate Emotions: Programming the RGB LEDs to change color based of the emotion you want to portray (e.g., blue for sad, red for angry). | |||
*'''Plug and Play Ports :''' Roboki features plug and play ports that allow you to easily connect external sensors and modules. This expandability makes it possible to enhance your projects with additional functionalities. | |||
====<u><big>Mechanical Specifications:</big></u> ==== | |||
= | ===== Dimensions ===== | ||
{| class="wikitable" | {| class="wikitable" | ||
| | !Dimension | ||
| | !Measurement | ||
|- | |||
|'''Width''': | |||
|48.2 mm | |||
|- | |||
|'''Length''': | |||
|64.3 mm | |||
|- | |||
|'''Height''': | |||
|21.8 mm | |||
|- | |- | ||
|Dimensions | |Dimensions | ||
| | |Length: '''64.3 mm''', Width: '''48.2 mm''', Height: '''21.8 mm''' | ||
|- | |- | ||
|Weight | |Weight | ||
| | |'''63.6 grams''' | ||
|} | |||
===== Weight ===== | |||
===== Nuts, Screws and Acrylic sheet ===== | |||
There is a protective acrylic sheet secured on top of the Roboki Brick. It shields the switches, ports, and other components while keeping everything neatly covered. The sheet measures '''''47.7 mm''''' in width, '''''63.8 mm''''' in length, and has a thickness of '''''3 mm''''', leaving a 5 mm clearance above the board. Four screws and nuts, located at the corners of the Roboki, hold the acrylic sheet firmly in place. The hardware used are '''''M2.5 x 16 mm''''' self-tapping screws and '''''M3 x 5 mm''''' metal hex spacers. | |||
==== <u><big>Electronics Specifications:</big></u> ==== | |||
===== Processor Specification ===== | |||
The technical specifications of Roboki ensure that it meets the needs of young learners while providing enough functionality for advanced robotics projects. From its precise motor controls to its versatile GPIO ports, Roboki is built to offer flexibility, power, and connectivity for various creative applications.Let's take a detailed look at the specifications of Roboki : | |||
{| class="wikitable" | |||
!Specification | |||
!Details | |||
|- | |- | ||
| | |Processor | ||
| | |'''96 MHz RISC-V''' | ||
|- | |- | ||
| | |Core | ||
| | |32 bit RISC-V | ||
|- | |- | ||
| | |Architecture | ||
| | |40nm | ||
|- | |- | ||
| | |Flash Memory | ||
| | |'''4 MB''' Flash | ||
|- | |- | ||
| | |SRAM | ||
| | |'''320 KB''' RAM | ||
|- | |||
|Connectivity | |||
|Bluetooth 5.0, USB, WiFi | |||
|} | |||
==== Ports and connectivity ==== | |||
When it comes to connectivity, Roboki features Bluetooth 5 Low Energy, allowing you to pair it seamlessly with the [[PLODE|''PLODE app'']]. This ensures fast, secure communication while consuming minimal power. For wired connections, you get a USB Type-C port that supports power input at 5V and is compatible with data transfer needs. Plus, there are two 3.5mm aux ports. These clever dual ports can expand to four GPIO connections with splitters, handling both analog and digital signals. They are perfect for connecting sensors, motors, or other components, making Roboki a true multitasker. | |||
{| class="wikitable" | |||
!'''Ports & Connectivity Specification''' | |||
!'''Details''' | |||
|- | |- | ||
| | |Connectivity Protocol | ||
| | |Bluetooth 5.0 (Low Energy), USB, WiFi | ||
|- | |- | ||
| | |USB Port Type | ||
| | |Type-C | ||
|- | |- | ||
| | |USB Input Voltage | ||
| | |5V | ||
|- | |- | ||
| | |Aux Ports | ||
| | |Two 3.5mm ports | ||
|- | |- | ||
| | |Total Ports | ||
| | |2 Dual GPIO ports, each having 2 GPIO's | ||
|- | |- | ||
| | |Port Functionality | ||
| | |Both Analog and Digital GPIO | ||
|- | |- | ||
| | |Port Voltage | ||
| | |5V | ||
|} | |} | ||
= | ===== Battery ===== | ||
Roboki | Roboki is powered by a 3.7V 1200mAh Lithium Polymer (LiPo) battery, designed to keep you going without the constant need for a recharge. This internal battery provides a stable power source, ensuring the robots performs at its best for longer periods. It comes with built-in safety mechanisms to prevent overcharging or excessive discharge, making it not just efficient but also reliable. Additionally, Roboki's total power output is capped at 2.5A, ensuring inductive loads to work smoothly. Whether you are working on a long robotics session or experimenting with various attachments, the battery has got your back with consistent power delivery. | ||
Roboki | |||
{| class="wikitable" | {| class="wikitable" | ||
!'''Battery Specification''' | |||
!'''Details''' | |||
|- | |- | ||
| | |Type | ||
| | |Lithium Polymer (LiPo) | ||
|- | |- | ||
| | |Capacity | ||
| | |1200mAh | ||
|- | |- | ||
| | |Voltage | ||
| | |3.7V | ||
|- | |- | ||
| | |Maximum Current Output | ||
| | |2.5A | ||
|- | |- | ||
| | |Maximum Charging Current | ||
| | |960mA | ||
|} | |} | ||
Additionally, To protect Roboki’s internals, a special motor clutch system ensures that if any connected motor draws more power than Roboki can handle, it automatically shuts off after '''8 seconds'''. This safeguard keeps the circuits safe and prevents overheating, extending the overall life of the device.To protect Roboki’s internals, a special motor clutch system ensures that if any connected motor draws more power than Roboki can handle, it automatically shuts off after '''8 seconds'''. This safeguard keeps the circuits safe and prevents overheating, extending the overall life of the device. | |||
= | =Software control:= | ||
Roboki | Roboki can be coded and controlled using many methods. All these methods are using the PLODE app. | ||
'''What is the PLODE app?''' | |||
PLODE app and website transform coding and robotics into an exciting and accessible adventure for everyone, whether you’re a curious beginner or a tech enthusiast. With PLODE, you can effortlessly control and program an array of fantastic robots and kits like PeeCee, Roboki, PeeCee v0.1, Zing, Crawl-e, and Klaw. | |||
= | ==== Methods: ==== | ||
=== Methods : === | |||
Roboki can be programmed and controlled through various coding methods, offering flexibility for different skill levels. Whether you are a beginner exploring robotics for the first time or an advanced user looking for in-depth control, the PLODE app provides several ways to code your projects. Each method is tailored to different learning stages and preferences. | Roboki can be programmed and controlled through various coding methods, offering flexibility for different skill levels. Whether you are a beginner exploring robotics for the first time or an advanced user looking for in-depth control, the PLODE app provides several ways to code your projects. Each method is tailored to different learning stages and preferences. | ||
*'''Hexa Block Programming:''' A unique and intuitive block-based coding system tailored for beginners | *'''Hexa Block Programming:''' A unique and intuitive block-based coding system tailored for beginners. | ||
*'''Block Programming:''' Standard block-based coding similar to Scratch, ideal for younger users and beginners. | |||
*'''Flowchart Programming:''' A visual programming method that uses flowcharts to design logic. | |||
* '''Python Programming:''' For more advanced users, Python allows for detailed and sophisticated programming. | |||
*'''C Programming:''' Provides low-level control for advanced users familiar with C language. | |||
Note: for detailed explanation on how to use the above methods , visit [[PLODE]] | |||
= Roboki Sessions = | |||
Explore a range of [[Roboki sessions|''hands-on projects'']] designed to enhance your understanding of robotics, programming, and automation with Roboki. Whether you're just starting out or looking to take on advanced challenges, these activities will guide you through the basics of LED control, sensor integration, and AI applications. From building a simple traffic light system to programming a voice-controlled robot, each project offers practical experience in developing real-world robotic systems. Perfect for learners of all levels, Roboki projects provide an exciting way to bring your ideas to life! | |||
'''''Check out this page for knowing more about the projects: ● [[Roboki sessions]]''''' | |||
'''''For Tutorial videos of projects and more : ● [https://youtube.com/playlist?list=PLcKVhzOV2_qPGgVsOm78D1zNDUYYmHJRO&si=qvqJnyZLNCGaQh7w Roboki tutorials]''''' | |||
=Add-ON's= | |||
Enhance Roboki's capabilities with these add-ons: | |||
======'''<big>1.</big>''' <big>Ai-1</big>====== | |||
The integration of Ai-1 with Roboki significantly expands its functionality by introducing advanced visual recognition, voice interaction, and heightened environmental awareness. Connecting the Ai-1 through the plug-and-play ports and managing it via the PLODE app enables Roboki to perceive its surroundings in a smarter way. With Ai-1, Roboki can recognize objects, respond to voice commands, and detect movements, transforming it into an intelligent, interactive robot. This upgrade enhances Roboki's ability to engage dynamically, making it a more responsive and immersive learning tool. | |||
[[File:AI cam png.jpg|frameless|211x211px]] | |||
| | |||
| | |||
''See'' '''[[AI Cam|''Ai-1'']]''' | |||
=FAQs= | =FAQs= | ||
(''FAQs'') | |||
Latest revision as of 15:53, 27 January 2025

Meet Roboki, the perfect blend of fun, learning, and innovation. Roboki is a fully customizable and codable robotic kit designed to spark creativity and ignite curiosity in kids and beginners alike. It is not just a kit, it is your passport to the world of robotics and coding.
Packed with versatility, Roboki combines the magic of PeeCee and Playdynamex into one beginner-friendly package. Whether you're building your first robot or experimenting with advanced concepts, Roboki has you covered. While it doesn’t include built-in sensors, it’s designed for limitless expansion—plug in your favorite modules or sensors, and let the adventures begin! Its plug-and-play ports and compatibility with Yudu Robotics' PLODE platform make coding and controlling projects an absolute breeze.
Roboki empowers kids to build, code, and explore projects that enhance problem-solving, creativity, and technical know-how. From building a robot car to experimenting with sensors, the possibilities are endless. Affordable, straight forward, and packed with potential, it’s the ultimate starting point for anyone curious about robotics. Ready to turn curiosity into creation? Roboki is waiting ! Let's Dive more into Roboki.
Getting started
Getting started with Roboki is all about understanding its capabilities and diving into its exciting features. This guide will introduce you to Roboki’s specifications, its versatile features, and how to maximize its potential for building and coding projects. From connecting sensors and motors to exploring creative possibilities, you will get a comprehensive look at what makes Roboki an ideal robotics kit.
Hardware:
The Roboki-T1 includes various hardware components: the Roboki Brick and various other components such as Technic blocks, motors, sensors, and port connectors. Roboki's hardware is designed to support a variety of robotics projects with precision and flexibility. Its durable components, including motors and sensors, ensure smooth operation and enable interaction with the environment, making it perfect for both simple and complex builds.
Anatomy:
Roboki is designed with simplicity and functionality in mind, offering an intuitive layout for young learners to explore. Each part of the kit plays a specific role, from powering the robot to controlling its movements and sensors. Below is an overview of the key components and their functionalities:

| Part | Functionality |
|---|---|
| Type C Port | Used to power up Roboki and its Programming |
| Port A | GPIO Dual port (Supports Both Analog & Digital) |
| Port B | GPIO Dual Port (Supports Both Analog & Digital) |
| SW1 | User Codable Switch 01 |
| SW2 | User Codable Switch 02 |
| M1 | DC Motor Port 1 |
| M2 | DC Motor Port 2 |
| S1 | Servo Motor port 1 |
| S2 | Servo Motor port 1 |
| Reset Button | Change modes / Erase programs / Reset the device |
| ON / OFF | On / Off Switch
( Simply tap once to turn it on, and double-tap to turn it off ) |
| RGB Leds (eyes) | Output |
- Port A & Port B : Port A and Port B are dual-purpose ports, allowing you to connect two devices to each port using a splitter. This effectively gives you four ports in total. Both ports support analog and digital signals, offering flexibility—use them as 2 analog and 2 digital on each side or configure them as 4 analog and 4 digital ports altogether.

- M1 and M2 Motor channels are each configured to operate at 500mA current. Roboki's total power output is capped at 2.5A, ensuring smooth operation for all connected components. As long as the combined power usage of the motors and other components stays within this 2.5A limit, everything will run seamlessly.
- RGB LEDs (Eyes) : Roboki is equipped with customizable RGB LEDs that can be programmed to display different colors and patterns. These LEDs can be used to add visual effects to your projects, making them more interactive and engaging. Example Uses :
- Status Indicator: Programming the RGB LEDs to change color based on the status of your robot (e.g., green for active, red for error).
- Replicate Emotions: Programming the RGB LEDs to change color based of the emotion you want to portray (e.g., blue for sad, red for angry).
- Plug and Play Ports : Roboki features plug and play ports that allow you to easily connect external sensors and modules. This expandability makes it possible to enhance your projects with additional functionalities.
Mechanical Specifications:
Dimensions
| Dimension | Measurement |
|---|---|
| Width: | 48.2 mm |
| Length: | 64.3 mm |
| Height: | 21.8 mm |
| Dimensions | Length: 64.3 mm, Width: 48.2 mm, Height: 21.8 mm |
| Weight | 63.6 grams |
Weight
Nuts, Screws and Acrylic sheet
There is a protective acrylic sheet secured on top of the Roboki Brick. It shields the switches, ports, and other components while keeping everything neatly covered. The sheet measures 47.7 mm in width, 63.8 mm in length, and has a thickness of 3 mm, leaving a 5 mm clearance above the board. Four screws and nuts, located at the corners of the Roboki, hold the acrylic sheet firmly in place. The hardware used are M2.5 x 16 mm self-tapping screws and M3 x 5 mm metal hex spacers.
Electronics Specifications:
Processor Specification
The technical specifications of Roboki ensure that it meets the needs of young learners while providing enough functionality for advanced robotics projects. From its precise motor controls to its versatile GPIO ports, Roboki is built to offer flexibility, power, and connectivity for various creative applications.Let's take a detailed look at the specifications of Roboki :
| Specification | Details |
|---|---|
| Processor | 96 MHz RISC-V |
| Core | 32 bit RISC-V |
| Architecture | 40nm |
| Flash Memory | 4 MB Flash |
| SRAM | 320 KB RAM |
| Connectivity | Bluetooth 5.0, USB, WiFi |
Ports and connectivity
When it comes to connectivity, Roboki features Bluetooth 5 Low Energy, allowing you to pair it seamlessly with the PLODE app. This ensures fast, secure communication while consuming minimal power. For wired connections, you get a USB Type-C port that supports power input at 5V and is compatible with data transfer needs. Plus, there are two 3.5mm aux ports. These clever dual ports can expand to four GPIO connections with splitters, handling both analog and digital signals. They are perfect for connecting sensors, motors, or other components, making Roboki a true multitasker.
| Ports & Connectivity Specification | Details |
|---|---|
| Connectivity Protocol | Bluetooth 5.0 (Low Energy), USB, WiFi |
| USB Port Type | Type-C |
| USB Input Voltage | 5V |
| Aux Ports | Two 3.5mm ports |
| Total Ports | 2 Dual GPIO ports, each having 2 GPIO's |
| Port Functionality | Both Analog and Digital GPIO |
| Port Voltage | 5V |
Battery
Roboki is powered by a 3.7V 1200mAh Lithium Polymer (LiPo) battery, designed to keep you going without the constant need for a recharge. This internal battery provides a stable power source, ensuring the robots performs at its best for longer periods. It comes with built-in safety mechanisms to prevent overcharging or excessive discharge, making it not just efficient but also reliable. Additionally, Roboki's total power output is capped at 2.5A, ensuring inductive loads to work smoothly. Whether you are working on a long robotics session or experimenting with various attachments, the battery has got your back with consistent power delivery.
| Battery Specification | Details |
|---|---|
| Type | Lithium Polymer (LiPo) |
| Capacity | 1200mAh |
| Voltage | 3.7V |
| Maximum Current Output | 2.5A |
| Maximum Charging Current | 960mA |
Additionally, To protect Roboki’s internals, a special motor clutch system ensures that if any connected motor draws more power than Roboki can handle, it automatically shuts off after 8 seconds. This safeguard keeps the circuits safe and prevents overheating, extending the overall life of the device.To protect Roboki’s internals, a special motor clutch system ensures that if any connected motor draws more power than Roboki can handle, it automatically shuts off after 8 seconds. This safeguard keeps the circuits safe and prevents overheating, extending the overall life of the device.
Software control:
Roboki can be coded and controlled using many methods. All these methods are using the PLODE app.
What is the PLODE app?
PLODE app and website transform coding and robotics into an exciting and accessible adventure for everyone, whether you’re a curious beginner or a tech enthusiast. With PLODE, you can effortlessly control and program an array of fantastic robots and kits like PeeCee, Roboki, PeeCee v0.1, Zing, Crawl-e, and Klaw.
Methods:
Roboki can be programmed and controlled through various coding methods, offering flexibility for different skill levels. Whether you are a beginner exploring robotics for the first time or an advanced user looking for in-depth control, the PLODE app provides several ways to code your projects. Each method is tailored to different learning stages and preferences.
- Hexa Block Programming: A unique and intuitive block-based coding system tailored for beginners.
- Block Programming: Standard block-based coding similar to Scratch, ideal for younger users and beginners.
- Flowchart Programming: A visual programming method that uses flowcharts to design logic.
- Python Programming: For more advanced users, Python allows for detailed and sophisticated programming.
- C Programming: Provides low-level control for advanced users familiar with C language.
Note: for detailed explanation on how to use the above methods , visit PLODE
Roboki Sessions
Explore a range of hands-on projects designed to enhance your understanding of robotics, programming, and automation with Roboki. Whether you're just starting out or looking to take on advanced challenges, these activities will guide you through the basics of LED control, sensor integration, and AI applications. From building a simple traffic light system to programming a voice-controlled robot, each project offers practical experience in developing real-world robotic systems. Perfect for learners of all levels, Roboki projects provide an exciting way to bring your ideas to life!
Check out this page for knowing more about the projects: ● Roboki sessions
For Tutorial videos of projects and more : ● Roboki tutorials
Add-ON's
Enhance Roboki's capabilities with these add-ons:
1. Ai-1
The integration of Ai-1 with Roboki significantly expands its functionality by introducing advanced visual recognition, voice interaction, and heightened environmental awareness. Connecting the Ai-1 through the plug-and-play ports and managing it via the PLODE app enables Roboki to perceive its surroundings in a smarter way. With Ai-1, Roboki can recognize objects, respond to voice commands, and detect movements, transforming it into an intelligent, interactive robot. This upgrade enhances Roboki's ability to engage dynamically, making it a more responsive and immersive learning tool.

See Ai-1
FAQs
(FAQs)